Stroller Bag & A Vacation Passport

Goodness gracious, I was gone for a while! I have excuses, of course. My husband went TDY to San Antonio, so the Wee One and I had to go visit him! Which killed the car battery. Coming back, I was sick for a day, followed by an immediate need to pack and get out of town before a snowstorm shut down the airports. Luckily we were on the 6 a.m. flight. And, if the battery hadn’t died in San Antonio, it would have died sitting dormant in airport parking for 19 days, so, um, at least we didn’t have to deal with that after getting back from Christmas/Disney World.

Yes, Disney World! Not for Christmas, though. First we ran around the Eastern Seaboard visiting family. We had to go to Disney to get a vacation from our vacation! My husband and I “ran” the half-marathon in the coldest, wettest weather ever. Seriously. Florida. 32 degrees. Icy rain. I set the bar for future half-marathons reallllllly low.

On the plus side, we got a good amount of looks at the stroller bag and a decent amount of comments.  We bought little 12-ounce bottles of water and stuck them in various pockets – perfect fits! And wipes and napkins and other various child-related items fit neatly in the bag. Items like gloves and hats and scarves. Did I mention it was cold?

I didn’t finish lining the stroller bag (though I will…someday) but I found fun Mickey ribbon at a JoAnn’s in San Antonio to tie off the top. See? It was totally worth the drive! (I also saw some great Mickey dangly-sparkly-trim, but I restrained myself. For some reason.)

Another fun thing we did for the Wee One was a vacation passport. Idea totally stolen from the DIS wedding boards.

I bought a little 4×6, 99-cent photo album from Walmart and cut some Mickey scrapbook paper to fit. On each page, we wrote the park we were going to, important events (three o’clock parade – 3 p.m.), and our dining reservations. The Wee One and his auntie decorated it with stickers on the airplane, and he checked it every day to make sure we were going to the right place. (“Mom, this page says M-G-M, but the tram driver said ‘Hollywood Studios.'”)

Each page slips out of the sleeve, so minus the stickers, it’s reuseable for the next vacation. Take out the first page and it’s reuseable for ANY vacation. (Just kidding. Where else is there to vacation?)

So, I’m back and I’m sewing. I have three new projects, plus four quilts to make by April. And I’m taking the plunge and starting to display my wares for sale among friends. Not to mention a big surprise coming in March. Stay tuned!

Published in: on January 30, 2010 at 3:23 pm  Leave a Comment  
Tags: , , ,

Stash Project – Stroller Bag (Part 2)

Part 1

Today I worked on the bottom straps for the stroller bag. They came from the bottom hem of the jean shorts.

They were nice and wide and hence easy to slice right off.

I decided that I definitely need to sew them into the inside of the bag instead of the outside, because otherwise they detracted from the pockets. Yes, it’s the back, but whatever, I like seam ripping. So I ripped, placed, and measured.

I didn’t really need to pin it, but I was trying to figure out how to sew the strap into the seam and yet on both the inside and outside of the bag. Really makes a whole lot more sense to sew this BEFORE any of the bottom seams, but we’re learning as we go. If you sew it before all the seams, you can just stitch it in along the bottom and cross it on the way up the side.

Yeah, doing it before the seam would be MUCH easier. Next time! (Not that I’m planning another of these. And this strap wouldn’t exist on a purse made out of jeans. Oh well!)

After I sewed across the above seam to seal it on the inside and outside, I sewed it along in the inside to secure it. PAIN IN THE BUTT! (Have I mentioned this would have been a lot easier if, um, I had sewed the strap into the bottom seam?)

Way too much fabric, near impossible to keep everything flat and even, really impossible to get over the bunches at the corners and existing seams. My sewing machine can do a circle of fabric, but I don’t think the manufacturing thought someone would be shoving jeans through the little opening underneath!

So it came out looking a little, um, interesting in the back. But it’s the back, so it’s OK.

The front looks fine!

And strapped to the stroller.

I’ll add velcro to the ends of the straps so if the Wee One ever wants to nap, we can release it easily so the stroller can recline. Not that the Wee One naps anymore, but…

Now I just have to figure out what to use for the top straps. As support straps instead of mostly decorative, they need to be a lot stronger than this one!

Published in: on September 4, 2009 at 12:19 pm  Leave a Comment  
Tags: ,

Stash Project – Stroller Bag (Part 1)

This is the ultimate stash project – a pair of old jean shorts and no pattern. I couldn’t find anything on the internet to go by! So I dragged the stroller into the bedroom (good thing the husband is off doing some training) and started cutting.

BTW, credit goes to my little sister. I mentioned that I wanted to make a stroller bag for our water bottles in Disney World, and also that I wanted to try my hand at making a purse and an apron out of old jeans. We were debating what to do with my Lucky jeans (will probably be the purse – lucky them!) when suddenly we realized, duh, jeans, stroller bag!

So I started with a pair of old, ripped jean shorts. I can’t fit them and probably won’t ever again. Not that they can be used for anything but gardening.

Sliced off about 6-8″ to get above the rip in the side. I made sure to stay below the pockets, though, so they can still be used from the outside. And then stitched a seam along the bottom.

Used some ribbon to hold it to the stroller. Conveniently, there’s holes at the belt loops in just the right places! I decided I wanted a little more curve on the bottom sides, so pinned those up and stitched them across. Inside is my 32-ounce Rubbermaid bottle – see, it fits perfectly! And see, it matches the stroller! Which is completely unintentional – heck, I don’t even like the color of the stroller. No, I did not get lime green because of the DIS! I got the lime green because that was the one that could be shipped fastest!

OK, so I had the outside of the bag down.

Well, mostly – I’m still considering embellishment with a Mickey ribbon through the belt loop or something. (Hobby Lobby has Disney Princess ribbon. No Mickey ribbon. Princesses suck.)

Oh, and I saved the bottom of the shorts – I’ll attach the nice wide hem to the bottom of the bag and use velcro on the ends to attach it to the stroller. This probably should have been done BEFORE sewing the sides up, but eh, c’est la vie. It’s the backside, anyway.

Also, I need to figure out what I’m going to use to attach the top to the stroller, as well. Probably with velcro, so we can pull it off and take it in line if need be. Ooh, and maybe it needs a strap for when we take it in line, too! Wait, this is getting a little complicated for a little pouch to hold water bottles and baby wipes. OK, the most important thing is that the straps be strong enough to hold 60+ ounces of water.

So now that I’m totally undecided on the details of the outside, it’s time to think of the inside! Since the bag is primarily for Disney World (the Wee One walks everywhere else), I pretty quickly settled on this.

Bought it for bathroom curtains three houses and one apartment ago. (You’d think would be a long time ago, but yet it was…last summer…) Never made them for the house with a bathroom window, and the last two houses and apartment haven’t had a window in the Mickey bathroom. So the fabric was just begging to be used in a WDW stroller bag! And, when folded over and attached just under the hem of the pants, is the perfect size. With more than plenty left over for some dividing inside pockets, and trim (I think it need a Mickey patch on the outside, right?), and…

So now I’ve got to decide what I want in the inside, and cut and sew. Off to research purse linings! And hunt for Mickey ribbon! And…!

Published in: on August 27, 2009 at 2:33 pm  Leave a Comment  
Tags: ,

Spring Messenger Bag – Sewing Together

messengerbag_cutting

Fabric for the inner and outer was doubled over and cut from the top edge like pictured – that way there was plenty of leftover on the bottom for long straps and solid pieces from the right side for scrap projects.

messengerbag_cat

Because everyone loves knowing there was a cat butt on their purse.

messengerbag_interfaced

Sewing the purse together is simple – first sew across the top of the wrong sides of the pocket (1/4 seam), flip and press. Line up the pocket between the wrong sides of the outer and sew it together. Match up the inner pocket, wrong sides, and sew together. Cut triangles into the corners to make it flip easier and press the seams out.  Then the inner lining goes inside the bag. Easy!

BTW, I like to wear skirts when I sew because when I clip the edges of the corners, it’s easier to catch everything in my lap.It’s a good catch-all for threads and such too.

Also, I use a (clean) meat skewer to get the corners perfectly pushed out. Alton Brown recommends a 12-inch metal with a loop on the end for the best kebab grilling – it’s also the best for sewing.

For the straps, I cut them at 3″ wide, one side from the green polka dots and the other from the purple flowers. Fused some interfacing to them, sewed them together on the wrong sides, pressed and flipped. Folded over the edges and sewed them together with a decorative stitch. Same decorative stitch up the other side. On the other purse, I sewed the wrong sides together on both sides, and then pulled it right side out, but I wasn’t sure how well that would work with the interfacing – it’s not exactly as fluid as fabric! (Yes, I know that’s the point now!)

My bag has one long strap attached to the bag portion. However, my friend’s daughter is obviously way smaller than me, so I cut the strap in half (actually, closer to 20″ on one and 24″ on the other). I was planning on rounding the ends of the straps and having my friend do a pretty tie to her daughter’s size, but the interfacing seemed too stiff to pull off a good knot.

So it was back to Hobby Lobby for a couple D-rings. Which are much harder than you’d think to sew onto the edge of the strap! After a couple of false starts, I got them attached, but the end of that strap looks a good bit messy. But once the straps are wound together and the green is on top of the purple, it looks really good. So good that I forgot to take a picture!

At this point, all that needs to be done is the top of the bag. Straps are pinned on properly, edges folded over neatly, decorative stitch applied, straps are tripled-stitched, and it’s done! And into the washer to remove all cat-butt-imprints.

I will add a picture of the finished product when my friend receives it, since I totally forgot to take a picture before getting it in the mail. I was in a hurry to get to the Post Office by five. Which turned out to be a moot point because in Texas, post offices close by 4:30. Luckily Mailboxes Etc does not!

Published in: on March 7, 2009 at 2:21 pm  Leave a Comment  
Tags:

Spring Messenger Bag – Interfacing

So, like I said, I didn’t use interfacing on my messenger bag. Mostly because, well, Home Ec class never covered interfacing and it’s not something typically used in quilting. Typically – in my research, I’ve learned that there is fusible batting which is a similar idea.

I head off to Hobby Lobby and get a half yard, deciding that “medium-to-heavy” would be right. Well, first off, interfacing isn’t doubled over a bolt like fabric. So already I have half as much as I need. And as I fuse the heavy stuff to the pocket fabric, it feels….heavy. But not too bad, so I go with it. Maybe it’ll get less stiff in the wash…

Back to Hobby Lobby for more interfacing, and what luck – there’s interfacing in the clearance bin! Two yards for $3! Yes! I can’t read the type because of the label over top of it, but how can you go wrong with clearance interfacing?

I mean, what are the chances that it could actually be fusible web?

So I had a heavy-duty-interfaced pocket and a very-barely-lightly-webbed-interfaced outer and liner.

So back to the store AGAIN! This time I actually looked at everything and purchased a yard and a half of medium-weight interfacing. And other than getting some of the sticky-stuff-that-makes-it-bond-to-the-fabric on the outer purse (and my poor borrowed iron), fusing goes along nicely.

messengerbag_cut

I left the pocket with heavy interfacing, the outer with the web, and the inner with the web and medium interfacing.

Published in: on March 7, 2009 at 1:50 pm  Leave a Comment  
Tags:

Spring Messenger Bag – Fabric and Pattern

This one is a purse I made for myself just for fun – I needed something bigger than my wristlet because my super-fun sliding-QWERTY-keypad-for-super-fast-texting cell phone was too fat. So we went off to Hobby Lobby, bought 1.25 yards of fabric for a mere $7, cut out a pattern, made a bunch of mistakes, but ended up with a pretty cool little messenger bag.

springbag_1stdraft

So the lessons I learned were: don’t ignore the instructions for fusible interfacing. Don’t ignore the instructions for fusible interfacing. Don’t ignore the instructions for fusible interfacing.

Yeah, this sucker needs some interfacing. Especially in the strap. It’s only been a month and mine has totally lost its shape and I’m always afraid the straps are going to pull out of the bag.

Also, don’t be stupid and sew all the layers together. Even if it’s the correct order, your liner will have a seam on the inside instead of the outside. Duh. Eventually I’m going to be spending some time with the seam ripper.

Anyway, posted the previous picture on Facebook and one of my friends asked me to make one for her daughter, a purse fanatic. Sure, why not? I’d even use interfacing! So I headed back to Hobby Lobby for the fabric.

And it was sold out.

And the lady at the cutting table claimed they wouldn’t be getting any more in.

Argh!

I searched online for the pictures of the other fabrics in the line to show my friend, but it’s a Hobby Lobby specific brand and not online.

Argh!

Then I was there buying something else a couple weeks later and the fabric was right there!

Woohoo!

I love-love-love this fabric. It’s pre-matched which is even better! Flowers for the outside (1/2 yard), dots for the inside (1/2 yard) and stripes for the pocket (1/4 yard). Cut correctly, you have plenty of the dots or flowers leftover for the strap. And enough other scraps for a coin purse or checkbook cover or, for my friend’s daughter, an eyeglass holder.

spring_bag_fabric

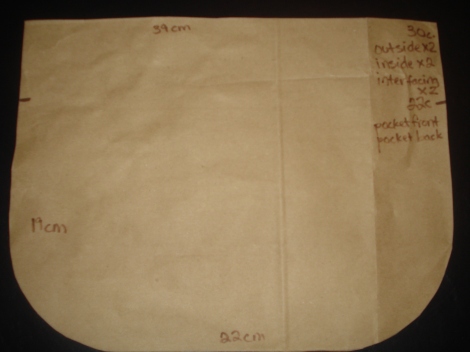
The pattern came from U-handbag, which is one of my new favorite sewing sites. (I’m also a fan of Sew Mama Sew. Just sew you know. Hee!) The gal who runs U-handbag is English, so the measurements are in centimeters. I didn’t bother translating it into American – it’s the right size as is. I didn’t do her straps or the button or the piping – just the basic bag pattern.

spring_bag_pattern

It’s a pretty simple pattern – 39 cms across the top, 30 cms to the bottom. Start the curve 10 cms from the bottom and 10 cms in from each side. I used a plate to get the perfect curve. The pocket is the same bottom and 22 cms to the top. Cut two pocket pieces and two pieces of interfacing, cut two each of the outside and the liner and four total pieces of interfacing from the bigger portion of the pattern.

Next up, adventures in interfacing!

Published in: on March 1, 2009 at 5:41 pm  Leave a Comment  
Tags: ,